
Page 83 - Friedman Archives
P. 83
ISO 83
3.5.1 HIGH ISO NOISE LEVELS
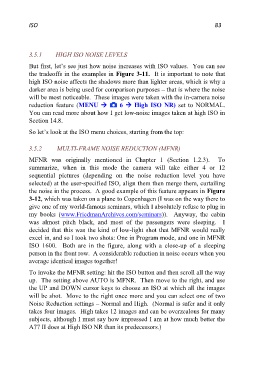
But first, let’s see just how noise increases with ISO values. You can see
the tradeoffs in the examples in Figure 3-11. It is important to note that
high ISO noise affects the shadows more than lighter areas, which is why a
darker area is being used for comparison purposes – that is where the noise
will be most noticeable. These images were taken with the in-camera noise
reduction feature (MENU 6 High ISO NR) set to NORMAL.
You can read more about how I get low-noise images taken at high ISO in
Section 14.8.
So let’s look at the ISO menu choices, starting from the top:
3.5.2 MULTI-FRAME NOISE REDUCTION (MFNR)
MFNR was originally mentioned in Chapter 1 (Section 1.2.3). To
summarize, when in this mode the camera will take either 4 or 12
sequential pictures (depending on the noise reduction level you have
selected) at the user-specified ISO, align them then merge them, curtailing
the noise in the process. A good example of this feature appears in Figure
3-12, which was taken on a plane to Copenhagen (I was on the way there to
give one of my world-famous seminars, which I absolutely refuse to plug in
my books (www.FriedmanArchives.com/seminars)). Anyway, the cabin
was almost pitch black, and most of the passengers were sleeping. I
decided that this was the kind of low-light shot that MFNR would really
excel in, and so I took two shots: One in Program mode, and one in MFNR
ISO 1600. Both are in the figure, along with a close-up of a sleeping
person in the front row. A considerable reduction in noise occurs when you
average identical images together!
To invoke the MFNR setting: hit the ISO button and then scroll all the way
up. The setting above AUTO is MFNR. Then move to the right, and use
the UP and DOWN cursor keys to choose an ISO at which all the images
will be shot. Move to the right once more and you can select one of two
Noise Reduction settings – Normal and High. (Normal is safer and it only
takes four images. High takes 12 images and can be overzealous for many
subjects, although I must say how impressed I am at how much better the
A77 II does at High ISO NR than its predecessors.)