
Page 142 - Friedman Archives
P. 142
142 The “Recording” (Camera icon) Menu Settings
5.7.5 SELF-TIMER CONTINUOUS
This works just like your normal 10-second self-timer, except it
will take either 3 or 5 images in a row – as fast as it can. So don’t
be surprised if you end up with 3 or 5 images that are nearly
identical.
To select, go to the Drive Mode menu, select Self-Timer Continuous, then
use the left and right cursor keys to choose either 3 or 5 images.
5.7.6 BRACKETING
Bracketing was a concept that was very useful in the days of film
– specifically when shooting transparencies, where you had to
really nail the exposure in-camera and there was no such thing as
post-processing. While in the days of shooting slide film this was an
important function, in the era of digital (where you can see a preview of
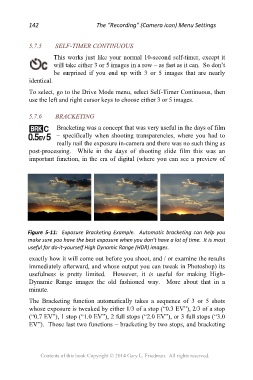
Figure 5-11: Exposure Bracketing Example. Automatic bracketing can help you
make sure you have the best exposure when you don’t have a lot of time. It is most
useful for do-it-yourself High Dynamic Range (HDR) images.
exactly how it will come out before you shoot, and / or examine the results
immediately afterward, and whose output you can tweak in Photoshop) its
usefulness is pretty limited. However, it is useful for making High-
Dynamic Range images the old fashioned way. More about that in a
minute.
The Bracketing function automatically takes a sequence of 3 or 5 shots
whose exposure is tweaked by either 1/3 of a stop (“0.3 EV”), 2/3 of a stop
(“0.7 EV”), 1 stop (“1.0 EV”), 2 full stops (“2.0 EV”), or 3 full stops (“3.0
EV”). Those last two functions – bracketing by two stops, and bracketing
Contents of this book Copyright © 2014 Gary L. Friedman. All rights reserved.