
Page 349 - Friedman Archives
P. 349
Chapter 9 THE “SETUP” (TOOLBOX ICON)
MENU SETTINGS
9.1 MONITOR BRIGHTNESS
Menu Position MENU 1 Monitor Brightness
What it Does Lets you bypass the light sensor which determines the LCD
screen brightness, from -2 to +2. Also provides a “Sunny Weather” mode so
you can compose your shot in bright sunlight
Recommended Setting Manual +1 unless you’re at the beach.
To save battery power, the rear
LCD can change its brightness
depending upon the ambient light
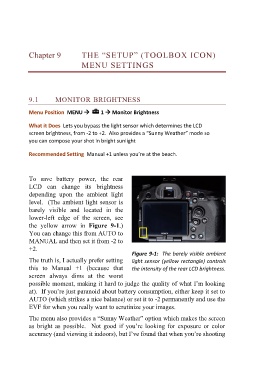
level. (The ambient light sensor is
barely visible and located in the
lower-left edge of the screen, see
the yellow arrow in Figure 9-1.)
You can change this from AUTO to
MANUAL and then set it from -2 to
+2.
Figure 9-1: The barely visible ambient
The truth is, I actually prefer setting light sensor (yellow rectangle) controls
this to Manual +1 (because that the intensity of the rear LCD brightness.
screen always dims at the worst
possible moment, making it hard to judge the quality of what I’m looking
at). If you’re just paranoid about battery consumption, either keep it set to
AUTO (which strikes a nice balance) or set it to -2 permanently and use the
EVF for when you really want to scrutinize your images.
The menu also provides a “Sunny Weather” option which makes the screen
as bright as possible. Not good if you’re looking for exposure or color
accuracy (and viewing it indoors), but I’ve found that when you’re shooting