
Page 120 - Friedman Archives
P. 120
120 Wi-Fi and NFC
1) Playback your images on the back of your camera, and stop when you
see an image you want to share.
2) Hit the Fn button (or go to MENU 1 Send to Smartphone).
3) The camera will then ask
you to choose between
“Select on This Device” or
“Select on Smartphone”.
4) For simplicity and to save
time, choose “Select on this
device”, which leads you to
a further submenu: “This
Image,”, “All Still Images
on Date”, or “Multiple
Images”. I’d like to think
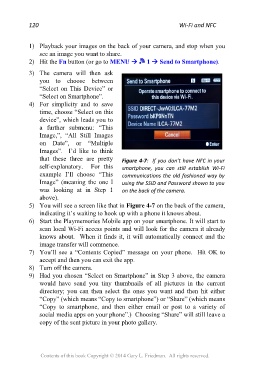
that these three are pretty Figure 4-7: If you don’t have NFC in your
self-explanatory. For this smartphone, you can still establish Wi-Fi
example I’ll choose “This communications the old fashioned way by
Image” (meaning the one I using the SSID and Password shown to you
was looking at in Step 1 on the back of the camera.
above).
5) You will see a screen like that in Figure 4-7 on the back of the camera,
indicating it’s waiting to hook up with a phone it knows about.
6) Start the Playmemories Mobile app on your smartphone. It will start to
scan local Wi-Fi access points and will look for the camera it already
knows about. When it finds it, it will automatically connect and the
image transfer will commence.
7) You’ll see a “Contents Copied” message on your phone. Hit OK to
accept and then you can exit the app.
8) Turn off the camera.
9) Had you chosen “Select on Smartphone” in Step 3 above, the camera
would have send you tiny thumbnails of all pictures in the current
directory; you can then select the ones you want and then hit either
“Copy” (which means “Copy to smartphone”) or “Share” (which means
“Copy to smartphone, and then either email or post to a variety of
social media apps on your phone”.) Choosing “Share” will still leave a
copy of the sent picture in your photo gallery.
Contents of this book Copyright © 2014 Gary L. Friedman. All rights reserved.