
Page 133 - Friedman Archives
P. 133
Panorama (Size and Direction) 133
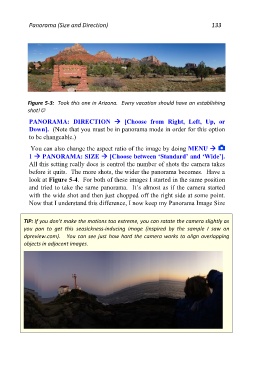
Figure 5-3: Took this one in Arizona. Every vacation should have an establishing
shot!
PANORAMA: DIRECTION [Choose from Right, Left, Up, or
Down]. (Note that you must be in panorama mode in order for this option
to be changeable.)
You can also change the aspect ratio of the image by doing MENU
1 PANORAMA: SIZE [Choose between ‘Standard’ and ‘Wide’].
All this setting really does is control the number of shots the camera takes
before it quits. The more shots, the wider the panorama becomes. Have a
look at Figure 5-4. For both of these images I started in the same position
and tried to take the same panorama. It’s almost as if the camera started
with the wide shot and then just chopped off the right side at some point.
Now that I understand this difference, I now keep my Panorama Image Size
TIP: If you don’t make the motions too extreme, you can rotate the camera slightly as
you pan to get this seasickness-inducing image (inspired by the sample I saw on
dpreview.com). You can see just how hard the camera works to align overlapping
objects in adjacent images.