
Page 232 - 2019 SHOP MANUAL CRF1000/A/D
P. 232
du
dummyheadmmyhead
CYLINDER HEAD/VALVE/CAMSHAFT
VALVE SEAT INSPECTION/REFACING
Disassemble the cylinder head (page 10-14).
[1]
Clean the intake and exhaust valves thoroughly to
remove carbon deposits.
Apply a light coating of Prussian Blue to the valve
seats.
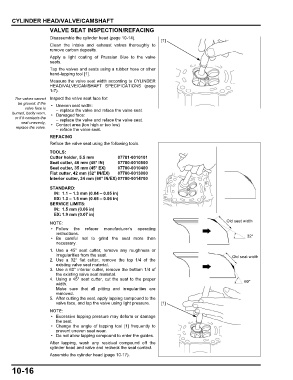
Tap the valves and seats using a rubber hose or other
hand-lapping tool [1].
Measure the valve seat width according to CYLINDER
HEAD/VALVE/CAMSHAFT SPECIFICATIONS (page
1-7).
The valves cannot Inspect the valve seat face for:
be ground. If the • Uneven seat width:
valve face is – replace the valve and reface the valve seat.
burned, badly worn, • Damaged face:
or if it contacts the – replace the valve and reface the valve seat.
seat unevenly, • Contact area (too high or too low)
replace the valve.
– reface the valve seat.
REFACING
Reface the valve seat using the following tools.
TOOLS:
Cutter holder, 5.5 mm 07781-0010101
Seat cutter, 40 mm (45° IN) 07780-0010500
Seat cutter, 35 mm (45° EX) 07780-0010400
Flat cutter, 42 mm (32° IN/EX) 07780-0013000
Interior cutter, 34 mm (60° IN/EX) 07780-0014700
STANDARD:
IN: 1.1 – 1.3 mm (0.04 – 0.05 in)
EX: 1.3 – 1.5 mm (0.05 – 0.06 in)
SERVICE LIMITS:
IN: 1.5 mm (0.06 in)
EX: 1.9 mm (0.07 in)
Old seat width
• Follow the refacer manufacturer’s operating
instructions.
• Be careful not to grind the seat more than 32°
necessary.
1. Use a 45° seat cutter, remove any roughness or
irregularities from the seat. Old seat width
2. Use a 32° flat cutter, remove the top 1/4 of the
existing valve seat material.
3. Use a 60° interior cutter, remove the bottom 1/4 of
the existing valve seat material.
4. Using a 45° seat cutter, cut the seat to the proper 60°
width.
Make sure that all pitting and irregularities are
removed.
5. After cutting the seat, apply lapping compound to the
valve face, and lap the valve using light pressure. [1]
• Excessive lapping pressure may deform or damage
the seat.
• Change the angle of lapping tool [1] frequently to
prevent uneven seat wear.
• Do not allow lapping compound to enter the guides.
After lapping, wash any residual compound off the
cylinder head and valve and recheck the seat contact.
Assemble the cylinder head (page 10-17).
10-16