Page 419 - 2019 SHOP MANUAL CRF1000/A/D
P. 419

dummyheadmmyhead
             du

                                                                       FRONT WHEEL/SUSPENSION/STEERING
                               HANDLEBAR LOWER HOLDER
                               REMOVAL/INSTALLATION
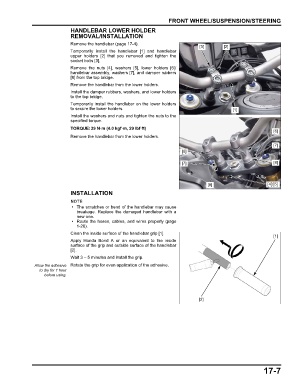
                               Remove the handlebar (page 17-4).
                                                                                    [3]        [2]
                               Temporarily  install the  handlebar [1] and  handlebar
                               upper holders [2] that you removed  and tighten the
                               socket bolts [3].
                               Remove the nuts [4], washers  [5],  lower holders [6]/
                               handlebar assembly, washers [7], and damper rubbers
                               [8] from the top bridge.
                               Remove the handlebar from the lower holders.
                               Install the damper rubbers, washers, and lower holders
                               to the top bridge.
                               Temporarily install the handlebar on the lower holders
                               to secure the lower holders.                                       [1]
                               Install the washers and nuts and tighten the nuts to the
                               specified torque.
                               TORQUE:39 N·m (4.0 kgf·m, 29 lbf·ft)
                                                                                                                   [6]
                               Remove the handlebar from the lower holders.
                                                                                                                   [7]
                                                                             [6]

                                                                             [7]                                   [8]


                                                                                        [8]                      [4]/[5]
                               INSTALLATION

                                • The scratches or bend of the handlebar may cause
                                 breakage. Replace the damaged handlebar  with a
                                 new one.
                                • Route the hoses, cables, and wires properly (page
                                 1-26).
                               Clean the inside surface of the handlebar grip [1].
                                                                                                                   [1]
                               Apply Honda Bond A  or  an  equivalent  to the inside
                               surface of the grip and outside surface of the handlebar
                               [2].
                               Wait 3 – 5 minutes and install the grip.

               Allow the adhesive  Rotate the grip for even application of the adhesive.
                  to dry for 1 hour
                    before using.


                                                                                    [2]


                                                                                                               17-7
   414   415   416   417   418   419   420   421   422   423   424