
Page 516 - 2019 SHOP MANUAL CRF1000/A/D
P. 516
du
dummyheadmmyhead
BATTERY/CHARGING SYSTEM
BATTERY BOX REMOVAL/
INSTALLATION
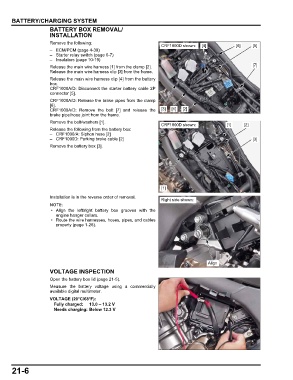
Remove the following:
CRF1000D shown: [4] [6] [5]
– ECM/PCM (page 4-39)
– Starter relay switch (page 6-7)
– Insulators (page 10-19)
Release the main wire harness [1] from the clamp [2]. [7]
Release the main wire harness clip [3] from the frame.
Release the main wire harness clip [4] from the battery
box.
CRF1000A/D: Disconnect the starter battery cable 2P
connector [5].
CRF1000A/D: Release the brake pipes from the clamp
[6].
CRF1000A/D: Remove the bolt [7] and release the [3] [1] [2]
brake pipe/hose joint from the frame.
Remove the bolt/washers [1].
CRF1000D shown: [1] [2]
Release the following from the battery box:
– CRF1000/A: Siphon hose [2]
– CRF1000D: Parking brake cable [2] [3]
Remove the battery box [3].
[1]
Installation is in the reverse order of removal.
Right side shown:
• Align the left/right battery box grooves with the
engine hanger collars.
• Route the wire harnesses, hoses, pipes, and cables
properly (page 1-26).
Align
VOLTAGE INSPECTION
Open the battery box lid (page 21-5).
Measure the battery voltage using a commercially
available digital multimeter.
VOLTAGE (20°C/68°F):
Fully charged: 13.0 – 13.2 V
Needs charging: Below 12.3 V
21-6