
Page 426 - 2019 SHOP MANUAL CRF1000/A/D
P. 426
du
dummyheadmmyhead
FRONT WHEEL/SUSPENSION/STEERING
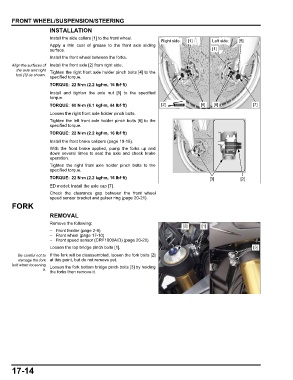
INSTALLATION
Install the side collars [1] to the front wheel.
Right side: [1] Left side: [5]
Apply a thin coat of grease to the front axle sliding
surface. [1]
Install the front wheel between the forks.
Align the surfaces of Install the front axle [2] from right side.
the axle and right Tighten the right front axle holder pinch bolts [4] to the
fork [3] as shown.
specified torque.
TORQUE: 22 N·m (2.2 kgf·m, 16 lbf·ft)
Install and tighten the axle nut [5] to the specified
torque.
TORQUE: 60 N·m (6.1 kgf·m, 44 lbf·ft) [2] [4] [6] [7]
Loosen the right front axle holder pinch bolts.
Tighten the left front axle holder pinch bolts [6] to the
specified torque.
TORQUE: 22 N·m (2.2 kgf·m, 16 lbf·ft)
Install the front brake calipers (page 19-18).
With the front brake applied, pump the forks up and
down several times to seat the axle and check brake
operation.
Tighten the right front axle holder pinch bolts to the
specified torque.
TORQUE: 22 N·m (2.2 kgf·m, 16 lbf·ft) [3] [2]
ED model: Install the axle cap [7].
Check the clearance gap between the front wheel
speed sensor bracket and pulser ring (page 20-21).
FORK
REMOVAL
Remove the following:
[2] [1]
– Front fender (page 2-9)
– Front wheel (page 17-10)
– Front speed sensor (CRF1000A/D) (page 20-20)
Loosen the top bridge pinch bolts [1]. [3]
Be careful not to If the fork will be disassembled, loosen the fork bolts [2]
damage the fork at this point, but do not remove yet.
bolt when loosening Loosen the fork bottom bridge pinch bolts [3] by holding
it.
the forks then remove it.
17-14