Page 242 - 2019 SHOP MANUAL CRF1000/A/D
P. 242

du
             dummyheadmmyhead

      ALTERNATOR/STARTER CLUTCH
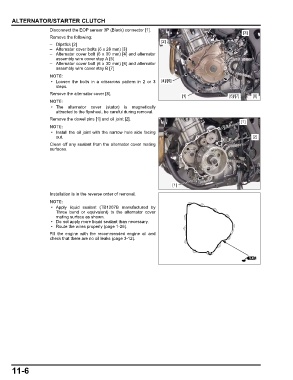
                      Disconnect the EOP sensor 3P (Black) connector [1].
                                                                                                       [3]
                      Remove the following:
                                                                    [2]
                      – Dipstick [2]
                      – Alternator cover bolts (6 x 28 mm) [3]
                      – Alternator cover bolt (6 x 30 mm) [4] and alternator
                        assembly wire cover stay A [5]
                      – Alternator cover bolt (6 x 30 mm) [6] and alternator
                        assembly wire cover stay B [7]


                       • Loosen the  bolts in a  crisscross  pattern in 2  or 3  [4]/[5]
                        steps.
                      Remove the alternator cover [8].
                                                                             [1]                 [6]/[7]   [8]
                       • The alternator cover (stator)  is magnetically
                        attracted to the flywheel, be careful during removal.
                      Remove the dowel pins [1] and oil joint [2].
                                                                                                      [1]

                       • Install the oil joint with the narrow hole side facing
                        out.                                                                               [2]
                      Clean off any sealant from the alternator cover mating
                      surfaces.


                                                                         [1]
                      Installation is in the reverse order of removal.

                       • Apply  liquid sealant  (TB1207B manufactured by
                        Three bond or equivalent) to the alternator cover
                        mating surface as shown.
                       • Do not apply more liquid sealant than necessary.
                       • Route the wires properly (page 1-26).
                      Fill the engine with the recommended engine  oil and
                      check that there are no oil leaks (page 3-12).


      11-6
   237   238   239   240   241   242   243   244   245   246   247